Thursday, June 23, 2011

[ALM, Unit Tests, SpecFlow] Magically generate your Unit Tests from the Specifications !!


(Sorry not translated from my French Blog : http://blogs.codes-sources.com/thavo/. Google Translation will help you)
Ce serait le rêve de générer par magie ses tests unitaires à partir des specs avant même d’avoir écrit son_code ?
  • A la fois on serait en TDD, qui est déjà un rêve pour une majorité d’entre nous. Vous avez déjà entendu d’un Directeur/Chef de projet “Oui, c’est super les TU… mais on n’a pas le budget, le temps, il y a plus prioritaire, etc…”
  • A la fois nos TU pourraient être “écrits” par le “Business Analyst” ou Chef de projet, si c’était le cas.
BDD existe déjà depuis un bout de temps, mais je voulais parler d’un outil particulier que nous allons découvrir ci-dessous.
PS: Dans ce cas BDD pas comme “Base De Données”, mais comme Behaviour Development Driven).

Comment cela peut fonctionner dans une ALM TFS en mode Agile ??
1.  Le Chef de projet ou Business Analyst écrit les specs dans TFS en tant que User Story. Voici un exemple : image
2. Toujours le Chef de projet ou Business Analyst écrit les scénarii de validation de tests d’acceptance afin de valider la User Story précédente.
Pour cela, écrit dans un fichier texte *.feature (compatible avec le standard Cucumber-Gherkin syntax) sous Visual Studio 2010 pour disposer de l’IntelliSense !!.
PS1: il y aurait moyen de créer cela en tant que WorkItem puis générer ce fichier texte.
PS2:  Pour faire le lien avec Scrum, on peut comparer cela à la “Definition Of Done”, qui doit être composé d’éléments mesurables, donc vérifiable (pas du genre… lorsque l’on clic sur le bouton “OK”, l’écran doit s’afficher rapidement).
image

3. Ensuite, toute la magie intervient dès que l’on fait Ctrl-S pour “enregistrer” ce fichier.

Cela génère près de 100 lignes de code de tests unitaires C# (de type MsTest, mais cela pourrait être aussi xUnit, NUnit, MbUnit).

”La magie” s’appelle SpecFlow !!
image

image
4. Enfin, on peut compiler le tout et lancer les Tests Unitaires. Ne pas paniquer, si cela ne passe pas, puisque cela respecte bien le principe de TDD se basant sur le “RGR” (Red GreenRefactor). “Red”… enfin, techniquement, ci-dessous c’est Orange, car Inconclusive.
image

5. Comme c’est en “Red”, le développeur doit coder le code Business (ou bien le connecter ou bien injecter des objets existants) afin de le faire passer au Green. Pour cela, il suffit de copier / coller le code en bleu ci-dessous généré par TeamSpec (il y a probablement un autre moyen).

On colle cela dans un autre fichier; bon, pour faire passer au Green, j’ai mis partout des Assert True à titre d’exemple.

image  image
Lorsque tout est Green, on connecte le tout à la TeamBuild TFS afin d’être certain qu’il n’y ait pas de régression à chaque Check-in (si Gated Check in), ou bien tous les soirs.

Ensuite, on “Refactor” la partie Business, voir ses TU afin de faire plus propre. Puis, le CDP réitère en rajoutant des nouvelles “Definition Of Done”, donc cas recasse et nous voila reparti pour le cycle Red Green Refactor.

Pour aller plus loin dans les tests : Utiliser SpecFlow avec Coded-UI de VS2010 :
https://github.com/techtalk/SpecFlow/wiki/Using-SpecFlow-with-CodedUI-API

PS: Suite à l’installation de SpecFlow, ne comptez pas sur l’aide fournie pour vous donner un coup de main, mais votre moteur de recherche préféré (car l’aide PDF est en mode Brouillon et pas complet) ==> Il faut rajouter au crproj de test une référence vers l’assembly SpecFlow et un fichier App.Config contenant les informations suivantes (MsTest, mais vous pouvez choisir les autres types).

Tuesday, June 14, 2011

Build Silverlight ServiceReferences.ClientConfig for Staging AND Prod environment

You want to automate Silverlight Build and Deployment with Team Build of the TFS 2010 ?

Well you will soon be faced to the problem related to the ServiceReferences.ClientConfig file.
Indeed, this file, which references the WCF services inside your *.xap, has to be different for every environment.

So how to automate something ??

Here are possible ways :
  • Don't use those files, but rather store the information in a file such as WebConfig. It is a net solution especially if you are a Software vendor with many different customer (you dont want to unzip and edit your file per customer, just deliver exactly the same *.xap). However, this solution is quite 'tecky' to modify your Silverlight code to work that way,
  • You could create a tool based on a library to unzip then edit your XAP, http://sharpdevelop.net/OpenSource/SharpZipLib/Default.aspx
  • You could manually use 7-Zip to edit the Xap (just associate *.xap to 7-Zip) and change "Localhost" to your new endpoint,
  • You could use for instance InstallShield / WIX installer to perform this task,
  • An elegant and automated way is to use the *.csproj and Team Build to do that.
                . ServiceReferences.Staging.ClientConfig
                . ServiceReferences.Prod.ClientConfig
    This is the solution detailed here after.
In a *.csproj you could have noticed the following commented lines :
  <!-- To modify your build process, add your task inside one of the targets below and uncomment it. Other similar extension points exist, see Microsoft.Common.targets.
  <Target Name="BeforeBuild">
  </Target>
  <Target Name="AfterBuild">
  </Target>
  -->


Using the include's functionnality of Microsoft.Common.targets (more info here or here) is the method used, except that we are going to do it for a TeamBuild 2010.


    <Content Include="ServiceReferences.ClientConfig">
      <SubType>DesignerSubType>
    Content>
    <Content Include="ServiceReferences.Staging.ClientConfig">
      <DependentUpon>ServiceReferences.ClientConfigDependentUpon>
    Content


Which gives the following in VS2010 :


Then, in the csproj, perform a conditional execution of a XCOPY. For instance use either Condition="'$(IsDesktopBuild)'=='true'" but it is no more supported. Or, prefer using  $(BuildingInsideVisualStudio)

  <!-- Detect if Build inside Visual Studio (i.e.) or Team Build TFS 2010 -->
    <Exec Condition="$(BuildingInsideVisualStudio)=='true'"
        Command="XCOPY ServiceReferences.Dev.ClientConfig ServiceReferences.ClientConfig /R /Y"
IgnoreExitCode="true" />
    <Exec Condition="$(BuildingInsideVisualStudio)!='true'"
        Command="XCOPY ServiceReferences.Staging.ClientConfig ServiceReferences.ClientConfig /R /Y"
IgnoreExitCode="true" />
    <Exec Condition="$(BuildingInsideVisualStudio)!='true'" 
        Command="DIR *.* > BuildingInsideVisualStudio_NotTrue.txt"
IgnoreExitCode="true" />
    <Exec Condition="$(BuildingInsideVisualStudio)=='true'"
        Command="DIR *.* > BuildingInsideVisualStudio_True.txt"
IgnoreExitCode="true" />
  Target>

Done !

Next step is to use the file ServiceReferences.Staging.ClientConfig the same way as a Web.Config file, that uses XSLT transform to decrease the amount of maintenance.

Sunday, June 5, 2011

WebMatrix : Create your eCommerce website in few hours

INTRODUCTION :
After spending few hours is searching on the Internet a balanced combination to create a eCommerce Website, I wanted to present a way to create your first eCommerce Website in few hours (then few days !! to customize it and code features specific to your business).


INGREDIENTS:
Take some few ingredients below :
- Microsoft C# programming language [Free],
- Microsoft WebMatrix development's interface [Free],
- DotShoppingcart as your Open Source CMS and eCommerce platform (based on Microsoft ASP.Net)
- Use a 3 months free Hosting such as "Applied Innovation"


START THE FUN :
Once those elements setup, you could start the fun quickly :

Get your eCommerce Home page with your catalogue of any possible elements (here barrettes), where you already have by default functionnalities such as "filter by", "search", "sign in", "add to cart", ...

If you login as an Admin, you will be able to edit the content of your pages, parameterize them (add shipping or taxes options) and add more items to your catalogue.

Unfortunately, if you want to internationalize it (using Euros €€ currency and French language) you will have to have some coding efforts.


CMS TIME (Content Management):
Here is the way you could access your Admin area :

Then, still as an Admin, you will be able to vizualize all those options :


PUBLISHING TIME :
Once properly configured, publish this into your favorite Web Hosting provider which as to cope with ASP.Net as well as SQL Server 2008 (for instance Applied Innovation - I found it good, and if you are numerous to register, I might get some discounts :-) ).
Once registered, you will reveive a email with all information (including passwords, and attached file so that you don't even have to type anytine into WebMatrix settings, just import settings!)

 Then you could be lazy on the WebMatrix part, by just importing the settings attached on the previous email !


From my 3G+ Internet connection (hope it's faster on proper ADSL line) : After more than an hour of deployment (still in progress !! 20Mb and 1000 files) I hope to have a nice eCommerce Web site over the Internet ! and not anymore only on my computer.


GO BEYOND :
Finally, although you could get up and running quicky you eCommerce web site, unless you want to sell only in US some Barrettes, you will rapidely get stock. So either upgrade your OpenSource DotShoppingcart into a professional version ($995.00).
Else, if you have the budget to get a $12,000 budget to have a Visual Studio Ultimate with MSDN and have some programming knowledges, get your hands into the code, since it is compatible.

However, this project is "only" a Web Site type, and not a "Web Application". As a result, you will not benefits from the full potential of a robust ASP.Net web application.

DotShoppingcart opened and compiled with Microsoft WebMatrix :


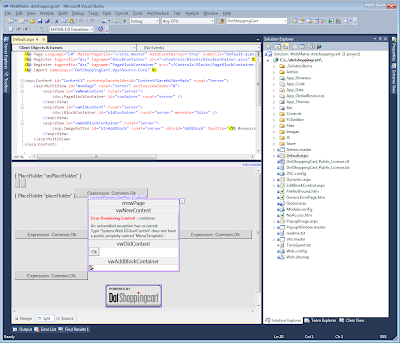
DotShoppingcart opened and compiled with Microsoft Visual Studio 2010 Ultimate :  


Enjoy eCommerce !!


NB 1 : I have not considered on purpose the heavy duty Microsoft Commerce Server, and wanted to consider a light weight framework
NB 2 : I have evaluated dashCommerce 3.4.438 wich seams good, but I had you work hard to migrate from VS 2008 to VS 2010 (confirmed by other blogs) and to parameterize their databases. Whereas with DotShoppingcart it was really easy to make it work.